
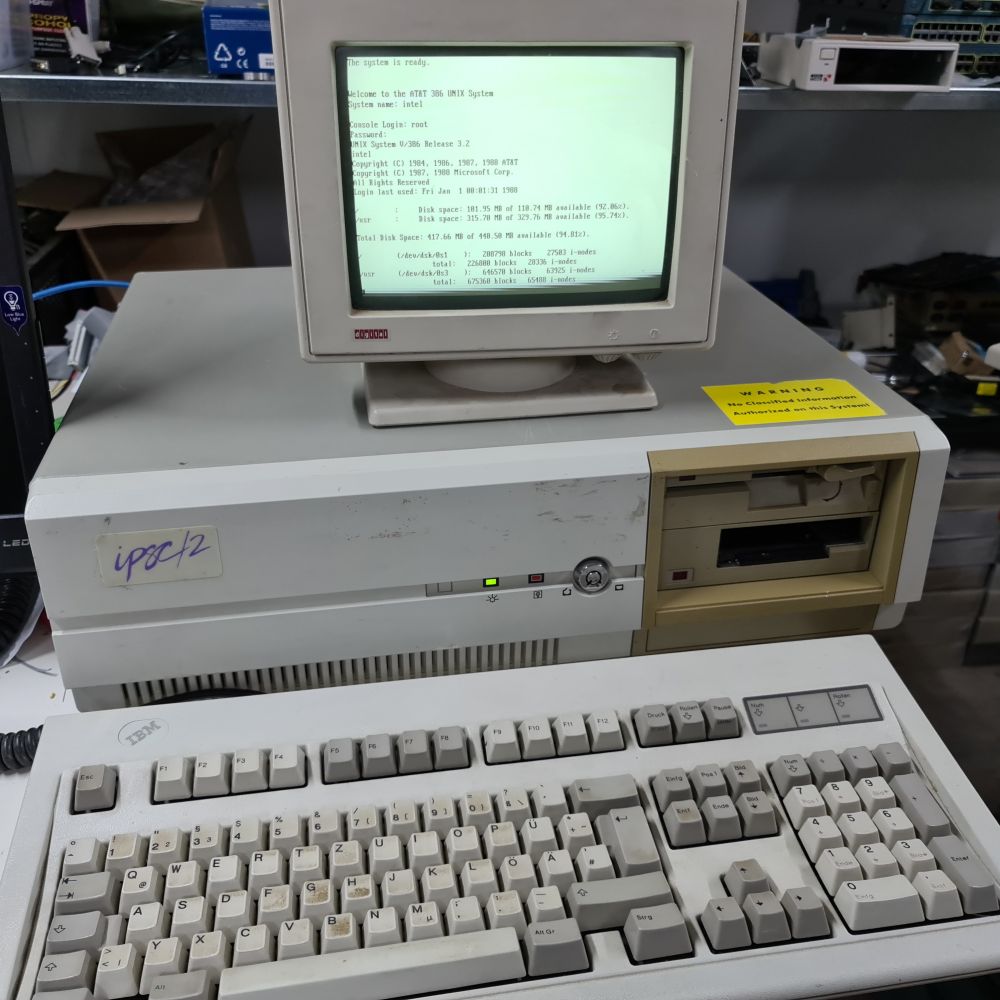
After a fair amount of work in a week's time, the Intel SYP301 that will serve as the Intel iPSC/860's SRM has booted!
Inventory
After we received the system, it was first thoroughly checked out. The power supply was checked and found to be working perfectly, and the insides of the system were very clean. Installed ISA cards going from left to right are:
- Intel PC586 Ethernet card
- Monochrome Graphics card (Hercules compatible)
- Bell XTC Tape system controller (with 60MB QIC tape drive)
- 8MB memory expansion card, in addition to 512KB on the main board (in a special 32-bit slot)
- DCM (Direct-Connect Module) card, to connect the SRM to the Hypercube (in a special 32-bit slot)
- Ultrastor 12F ESDI disk controller (with 380 MB Maxtor ESDI disk)
The DCM card is what enables this system to be an SRM for an Intel iPSC/2 or iPSC/860 Hypercube. It provides a proprietary high-speed data channel to Hypercube node 0. It plugs into a special, Intel-proprietary 32-bit slot. The main board in the Intel SYP301 is the only board that offers this slot, so making sure this system works is vital to the prospect of being able to restore our iPSC/860 to working order.
One clearly problematic bit of hardware is the QIC tape drive. These were never the most reliable tape drives to begin with, and after more than 30 years, they're more likely to destroy tapes than read them. Old QIC tapes themselves often have problems with their tension belts, and are our least favorite kind of tape to deal with. Unfortunately, all of the installation media for the IPSC software is on 45 and 60 MB QIC tapes.
First attempt to boot
So with that, we felt it safe to turn the system on and see what happens. The system turns on quite happily, and after checking all 8.5 MBs of its memory, warns us that the CMOS settings aren't valid. That's entirely possible, since the CMOS backup battery is missing. We'll replace that when we get a new battery holder.
After fixing the CMOS settings, we get further. There's a little bit of hard disk activity, followed by "Booting the UNIX system..." appearing on the screen. This is exciting! Unfortunately, after that, nothing happens anymore. After 15 minutes of no activity, it's clear that something isn't quite right.
So, the next thing we did, was to take the ESDI controller and ESDI disk, and transfer them into a Pentium-based Linux system. There, we used dd to create an image of the entire hard disk, which we then transferred to a more modern system. Looking at the disk image with a hex editor, it's clear that the 380 MB hard disk has been restructured a few times; there are some partial filesystems, but also two System V 1K filesystems that appear to be intact; a root filesystem, and a /usr filesystem, exactly what we'd expect. It looks like the VTOC is corrupted though, which would make it impossible to actually find those filesystems. So, on a copy of the disk image, we fixed the VTOC fields.
Playing with PCEM
We connected this fixed disk image to a PC emulator (PCEM), and try to boot from it. Unfortunately, that doesn't work, and shows exactly the same symptoms as on the real hardware. Along with the installation tapes, there is a boot disk that's meant as the first stage in installing Intel System V/386 R3.2 V2.1, so we made an image of it, and tried to boot that in PCEM. That boots, but the installation script fails early on, throwing us to a # prompt, which has severely limited functionality (most egregiously, no "ls" command). Looking at the disk image, we can figure out some of the commands and device names that should work. Using that, we find that we can actually mount the root and /usr filesystems from the ESDI disk image. That gives us a bit of hope!
However, all our attempts to make the disk image bootable fail. We also are unable to initialize a fresh disk image with new filesystems. It would appear that the diskette is corrupted. In fact, looking at the INSTALL script in the disk image, several files on the installation disk are overwritten every time an installation is performed, so we could easily see corruption happen.
Booting on PCEM
So, after a brief exploration of our options, we decide to see what we can do with an AT&T System V/386 V3.2 V2.3 boot disk image (found on Bitsavers). Using that image, we can follow the installation to initialize a new disk. After that step, one would normally reboot the system, boot from the newly initialized disk, and continue installation from tape media. Unfortunately, PCEM doesn't provide tape emulation. Instead, we boot from the diskette a second time, cancel the installation process, and get to the command line. We now mount the newly created filesystems, and remove all files from them. We then also mount the filesystems on the image we took from the ESDI disk, and use "find . -print | cpio -pdmau /mnt/new_filesystem" to transfer all the contents to the newly created filesystems. After that, it's time to boot PCEM from the new disk image, and the moment of truth. And, lo and behold, it works!


Installing software using PCEM
So, we now have the original system's OS and software running on the PCEM emulator. However, it seems that none of the software for the iPSC has been installed.
Out of the 22 QIC tapes we received, there are only a couple that we feel confident will work as-is. The other ones all need their tension belt replaced and possibly more repairs, which won't happen until later (we're out of the replacement belts we use, for one). The two tapes that seem to be ok do indeed read fine on the QIC drives we use for imaging (we try to keep these two Tandberg drives in pristine condition). One of these tapes contains the Intel TCP/IP stack, and the other contains additional software for the iPSC. So, now we have tape images of these two tapes. How do we get these installed? We decided to see if we could add a basic (read-only) tape emulation to PCEM. This turned out to be surprisingly easy. Looking at the manual for the Wangtek interface, and the BSD source code for the wt driver, we managed to create a working tape emulation inside PCEM in half a day. It's incredibly crude, can't be configured, crashes if you try to do anything we don't expect, but it works well enough for "installpkg" to be happy. We re-installed the TCP/IP stack, and one of the pieces of the additional iPSC software (the other bits won't install if the iPSC base software isn't installed).
Finally booting the real system
So, working on an emulator is nice, but we need to get the real system working again. So, we took the newly created disk image, and, using the Pentium system again, dd'ed it onto a much newer IDE disk. We may later try to put it on a solid state disk. After replacing the ESDI disk controller in the SYP301 with an IDE controller, and hooking up the IDE disk, we were finally able to boot the Intel system. After logging in as root (it took "John the Ripper" less than a second to figure out the password was "intel" we can briefly bask in the feeling of achievement, before realizing there's much left to do.


Next steps
So, what is left to do? First, we'll need to fix and image the remaining QIC tapes, or at least enough of them to install a complete set of tools for the iPSC. Then, we'll install the software using the emulator, and re-write the image to the IDE disk to get the software onto the SRM system. Then, we need to check out the Hypercube again - we briefly did so when we received it a few years ago, but we'll need to make sure it's safe to turn on. We'll also need to fix the cable between the SRM and the Hypercube, because it's cut nearly in half in the middle of the cable, and one of the connectors is broken. After that, we can hopefully get the iPSC/860 back up and running again.
In the meantime, we managed to make images of the floppy disks that came with the SRM, and made a start with scanning the documentation. These can be found in the "downloads" section in the menu on the right. Look in "bits/intel/iSPC2_860" and "pdf/intel/iPSC2_860".
See also: